Roguelike Game in C++17
Environment and project setup
Tools
Below is the listing of software, I have installed to write, version, build and debug. In install order:
- Visual Studio 2019 Community: I am using MSVC compiler, this is easiest way to get that.
Version:16.3.2. - Visual Studio Code: Pretty decent code editor, with plenty of extensions and good release cycle.
Version:1.38.1. - CMake: build generator. Seems to be one of the popular C++ build generators, supports many compilers and OSes.
Version:3.15.1. - VCpkg: C++ package manager and installer. Installs and builds packages from source, as such requires compiler already installed.
Version:2019.09. - GIT-SCM: Defacto version control system for any new code project. Also since github.com repo only works with git.
Version:2.23.0.
Configuration
After having installed the software above, there is a need to do some configuration.
VSCode Extensions
While VSCode is quite well featured out of the box, I prefer some extras to make the experience nicer.
- Bracket Pair Colorizer 2:
Optional, Quality of Life improvement. Find the code much easier to read when I can spot the bracket pair groups by color. - C/C++:
Required, out of the box VSCode doesn't support building C++ code. This extension by Microsoft fixes that. - CMake Tools Helper:
Required, similar to C++, out of the box VSCode doesn't support executing CMake builds. This extension makes that configuration easy.
This will installed 2 other extensions
VCpkg Configuration
Installation instructions for VCpkg are pretty good. There was no need to deviate from it.
I did add following two User Environment variables.
VCPKG_ROOTwith value of installation directory of VCpkg, which for me isD:\Projects\CPP\.packages\vcpkgVCPKG_DEFAULT_TRIPLETwith value ofx64-Windowsas I want to ensure vcpkg only generates 64-bit packages.
Project specific editor configuration
In order to make the code editing and debugging with VSCode a little bit less frustrating, there is a need to do some project specific setup.
- Intellisense settings.
This is done by press
F1and typingC\C++: Edit Configuration(UI).
On the window that comes up findCompiler argumentsand add following two values
/std:c++17
/permissive- Debugger settings. Next VSCode will need to know how to start the debugger.
For this go toDebugTab (Ctrl+Shift+D), and click on Small Gear icon called "Configure/Fix launch.json".
Select "C++(Windows)" as environment.
This will then create alaunch.jsonfile in.vscodedirectory. Modify this file, by changing following values."program": "${command:cmake.launchTargetPath}", "cwd": "${workspaceFolder}\\build\\bin", "externalConsole": true
After this is done, debugger can be launched using
F5.
Project Structure
The project's files are structured in following manner.
I am not listing files and directories not directly created by me. e.g .git and .vscode folders.
\roguelike\                 # Project's Root Folder
\roguelike\build\           # CMake build output will go here
\roguelike\docs\            # Github will use this as website folder
\roguelike\src\             # Project's source code lives here
\roguelike\external\        # External dependencies to Project Live here
Build configuration
CMake requires that every folder that participates in our build have a CMakeLists.txt file.
For this project, those folders are src and external. So we have total of 3 CMakeLists.txt files.
Located as such:
\roguelike\CMakeLists.txt           # Primary/Root CMake file
\roguelike\src\CMakeLists.txt       # Tell CMake how to build source for project
\roguelike\external\CMakeLists.txt  # Tell CMake how to consume dependencies
Each file is well documented, so I won't go over them here. Once files are created, VSCode will automatically
trigger CMake Tools which will create a build script. This can be executed using F7.
The Starter Project
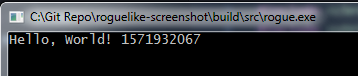
Hello World!
You can view the setup starter project on the github repo. Building it will require that you
install fmt using vcpkg. Project up to this point doesn't do much other than print
Hello World! followed by current time point.
\roguelike\src\main.cpp
\roguelike\CMakeLists.txt
\roguelike\src\CMakeLists.txt
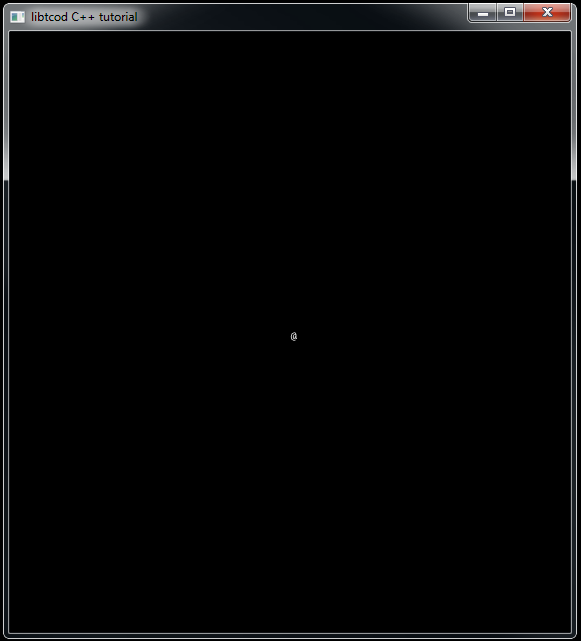
Using TCOD
In order to get a character on the screen, we need libtcod. We have two options here.
- Get the source code and build the library ourselves.
- Download pre-built package, and use those.
Place to go for either option is libtcod github repo. I am going to go with pre-built version. Author of libtcod uses VS2015, which is ABI compatible with our VS2019 setup. So everything should just work.
Having downloaded libtcod 1.14 x64. I've extracted the contents of the zip file
into \external\libtcod-1.14.0-x86_64-msvc folder. I've also added the folder to .gitignore
list, as I don't want to add this the project's source control.
You can view the state of the project as this point in time. If you are following along, note
the changes made to all the CMakeLists.txt as well as the src\main.cpp.
\roguelike\src\main.cpp
\roguelike\CMakeLists.txt
\roguelike\src\CMakeLists.txt
\roguelike\external\CMakeLists.txt
Links
╣ GitHub Repo ╠═══
╣ Home ╠═══
╣ Next: Console and moving around ╠═══